
I can’t even count how many years I’ve purchased a commercial pattern, cut out my size from the tissue, then constructed whatever it was that I was making. This pattern tissue-cutting practice worked relatively well for me until at some point my body measurements changed, I learned more about alterations and how to fit a pattern or I wanted to make up the same version for my daughter, a friend or client who may have required a different size. Sometimes a particular pattern I wanted to use again had since gone out of print and was no longer available.
One solution to what I describe above was to alter my previously-cut tissue pattern pieces, adjusting lengths, circumferences etc., sometimes estimating sizing grading to suit the specifications required. I’ve found these modifications and sizing tweaks tended to require a lot of extra pattern work, less than accurate results and considerable wear and tear on the already flimsy, previously cut up tissue paper pieces. To save time, if the pattern is still in print, I could potentially buy a new one and cut out a different size, or utilize an option that I find to be a simpler and sometimes cost-saving solution; tracing pattern pieces and sizes from a pristine, uncut pattern either newly purchased or already in my pattern stash.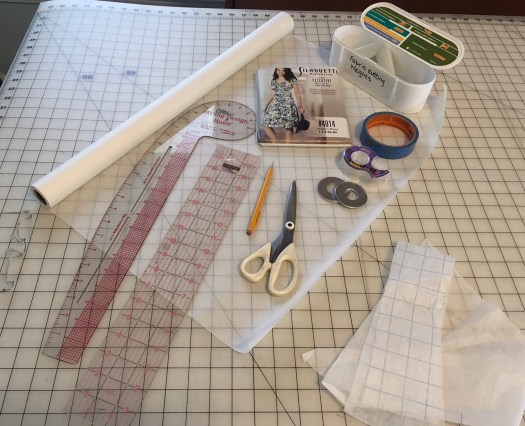
To be sure, the practice of tracing patterns and making muslins adds initial prep time prior to cutting my fashion fabric. This said, I’ve found the baseline sizing variables, grading information and ongoing versatility to be gained from tracing uncut patterns to be so satisfying that I’ve continued this practice with all the new patterns I’ve invested in for the last ten years. I love this method and have never looked back.
Several differences in opinion exist within sewing communities throughout the world regarding best practices for sewing construction methods. There are almost as many schools of thought in this same group of people regarding the practice (or necessity) of tracing patterns and preferred medium/methods to use. For example, several “old school”, “couture” professionals prefer the use of wax/carbon paper and a tracing wheel in transferring pattern information from tissue to thicker (butcher grade) pattern paper. I’ve used this method with some degree of success while continuing to experiment using different mediums and methods for transfer of information throughout the years, eventually narrowing things down to three workable alternatives.
The first is a thick, gridded and fibrous transparent paper/fabric made by the Pellon company (similar in weight to the heavy interfacing). The material works reasonably well for copying pattern pieces if you have a steady and accurate hand and are tracing the pattern lines with an indelible marker like a “sharpie” or a ballpoint pen. Colored pencils also work relatively well, but they need to be sharpened often and don’t really erase. I’ve also used a graphite pencil on this type of product which yields cleaner lines but again, if you need to correct a mistake, the lines don’t erase completely and tend to smudge or tear the surface in the process. If you’re using ink, you either have to cross out your mistakes or start anew. The 1″ square printed grid on this particular type of pattern paper/fiber is wonderful for lining up grain and fold lines. I think this product works best as a final pattern preservation solution, when you are confident your pattern pieces have reached a finished state. The approximate price point for this product is $20. for 44″x10 yards.
On the recommendation of a sewing class instructor, I decided to try “Swedish tracing paper”. I found it to be a very user-friendly product to work with. It is a thick, fiberous paper and works well with both ink or pencil. If you’re tracing with graphite pencils, your markings are technically erasable, but the erasing process must be done with a light touch or the lines will smudge. Both the gridded Pellon product and Swedish tracing paper can be sewn on if necessary. They also iron well and sewn-in changes remain intact. The price point for Swedish Tracing paper is approximately $16. for 10 yards x 24″ wide.
After much trial and error, I’ve ultimately landed on a product I really like called “Bee paper”, a tracing paper often used by “old school” architects.
While admittedly not as thick as Swedish Tracing paper, it’s sturdier and more durable than pattern tissue paper. It’s also highly transparent, easily erasable, smudge resistant and irons well. Though smooth to the touch, the paper has just enough surface texture to allow for scotch tape or painter’s tape to adhere to it and stay in place. I’ve found Bee Paper relatively easy to iron, but be careful around taped sections or the tape might melt and gunk up your iron surface. Ask me how I know! It’s 24″ wide and comes in 50 yard rolls for under $20. A great overall value.
Even though the ink from a sharpie pen is more visible, I personally like to trace with a mechanical pencil. It’s precise, doesn’t need sharpening, erases well and is less messy. I also trace patterns using my clear plastic quilting ruler and French Curve. Tracing with pencil doesn’t stain these like permanent markers do and doesn’t create ink-bleed on my fabric or gridded cutting table mat. This said, I do like using sharpies on my fabric muslins. Instead of pins, I like to trace my patterns using fabric weights and often use metal washers for this purpose which are very inexpensive and can be found at your local hardware store.
My personal storage method for my traced patterns is to fold the pieces so they will fit into a gallon-size ziplock bag then place the original pattern envelope/tissue into the same bag. When I want to use the pattern, I carefully iron out (dry iron) my traced pattern pieces prior to cutting out a garment and I’m good to go.
For a more permanent pattern preservation solution, I’ve observed professional tailors and pattern designers making a practice of cutting pattern pieces out of card stock, marking all notches, grain lines and other pertinent information in indelible ink. They punch holes near the ends of the pattern pieces and hang these on hooks, organized by pattern number and stored vertically to avoid creases and the need to iron pieces prior to cutting into the fashion fabric. With tried-and-true patterns and for those fortunate to have the extra vertical storage space, this might be the ultimate way to go.
In closing, though it may take extra time, I personally love the process of tracing a pattern. It’s the point of learning and discovering the potential of each piece, making appropriate alterations without permanently changing the original tissue and envisioning how everything will eventually come together. I also enjoy the ability to share my patterns with people who may want to experiment with a different size and have already cut out a specific size from the tissue of the same pattern. This happened at a sewing workshop I attended last Fall. I had the same pattern one of workshop participants was looking for and she was able to trace out a larger size from my original. The process worked like a charm.
